SPOOKMASTER ONLINE PUMPKIN CARVING PATTERNS


Halloween Pumpkin Carving and Painting Instructions

Follow these easy instructions for carving or painting your masterpiece!

Carving Painting Tips and Troubleshooting
Selecting a Pumpkin Be Careful!!! Mix n' Match

How to Get The Instructions
Download Instructions in an Acrobat® Reader TM File (below) or scroll down this page to learn how to carve and paint your masterpiece. Use the index above for easy reference.

SPOOKMASTER ONLINE PUMPKIN CARVING AND PUMPKIN CARVING PATTERNS INSTRUCTIONS
Click on the left to download a printable Acrobat file with all instructions. Acrobat files look best when viewed with Acrobat® Reader TM 5.x or higher. Make sure to save the file in a special SpookMaster folder so you can find it later.

GET ACROBAT READER


Getting Started

Please read all directions first even if you have done this before. Reading the directions will only take a few minutes and can remind you of important things that you may have forgotten. Always remember Safety First. Please read the precautions and do all your work safely. Never allow children to work unsupervised or to work with hazardous utensils or materials.

First select the patterns that you would like to carve. Check the carving difficulty before deciding which patterns to carve. Each pumpkin graphic contains information on the carving difficulty for specific patterns. Generally, the carving difficulties are:

  • Easy: Can be carved within about 30 minutes after the pumpkin is cleaned out. People who have little or no experience in carving specialty pumpkins can carve these. These patterns are also great for kids to carve or paint.
  • Moderate: Can be carved within 45 minutes to one hour after the pumpkin is cleaned out. People who have some experience in carving specialty pumpkins can carve these. Kids will need extra help if they try to carve or paint these patterns.
  • Challenging: Sometimes take over one hour to carve after the pumpkin is cleaned out. People who have experience in carving specialty pumpkins should carve these. Kids may not do well carving these pumpkins, but painting them may be easier. To make carving easier, be sure to scrape the pumpkin wall as thin as possible prior to carving.

Precautions

Read all instruction carefully. Carving and painting pumpkins requires the use of sharp objects that can cause injury if used carelessly or improperly. Users assume all risk of injury. Children can participate in many ways but must be closely supervised by adult(s) at all times.

Use of candles or other open flames should be done only with caution. If a candle is used in your pumpkin, make sure that the pumpkin is not placed near any fuel source for a fire. Do not leave the candle burning unattended, especially not overnight. If a candle presents any safety hazard, use a small flashlight or battery candle.

Always work safely. These precautions regard only some of the hazards that may exist. You are responsible for identifying hazards and preventing injuries.

Please be careful so that you can have a safe and happy Halloween!


Carving Tools

You will need the following tools for most carving patterns:

Scraper: Ice cream scoop, large spoon, or special pumpkin scraper scoop tool for cleaning out the pumpkin
Pumpkin Poker: Nail with tape on end to create handle or specialty poker tool for transferring the patterns onto the pumpkin. A push pin can also be used but it may not penetrate deeply enough into the pumpkin shell.
Hand Saws: You will need a few different hand saws
Large Saw: With blade approximately six inches long by ½ to 1 inch wide for major cutting like the lid. The lid can also be cut with a knife.
Medium Saw: With blade approximately two inches long by 1/5-inch wide for cutting larger sections of the pumpkin pattern.
Small Saw: With blade approximately two inches long by 1/8-inch wide for cutting smaller sections of the pumpkin pattern.
You can make the medium and small saws by fashioning a handle onto a jigsaw blade using tape. Make sure that blade will not cut you when it is used.
Drill Bit: A drill bit or specialized pumpkin drill
Power Tools: Yes, you can use small power tools for carving pumpkins. Small hand tools, such as Dremel® tools, with spiral saw blades can reduce the work of sawing and can make a power tool user very proud.
You may already have the tools you need to do all the carving work. If not, specialized pumpkin tools can be ordered online or bought at many grocery stores and department stores.

Carving Instructions

Step 1) Preparation
For easy cleanup, place your pumpkin on several layers of newspaper before carving. Clean the outside of the pumpkin with a rag moistened with water to remove dirt and debris.

Step 2) Draw and Cut Lid
Cut a six-sided lid, big enough so you can reach in and clean out all the pumpkin gunk. Angle a saw or knife toward the center of the pumpkin to create a ledge that supports the lid. Make sure the hole is large enough to reach in and pull out the seeds and stringy membrane. The bottom of the pumpkin could also be cut off instead; this will allow the pumpkin to sit up straight and make removing the seeds easier.

Step 3) Clean and Scrape
Using the flat-edged ice cream scoop or the special pumpkin scoop, clean out the seeds and strings. Where you plan to carve, scrape the pumpkin wall until it's about one inch thick. If carving a challenging pattern, scrape the pumpkin so that the wall is about one-half inch thick.

Step 4) Print and Attach Pattern
Select the pattern you want to carve from the Free Stuff page or the Subscriber site. Check the carving difficulty to make sure you want to carve that pattern. Print the pattern and tape or pin it to your pumpkin. If you use pins, place them on the design lines so you don't end up with holes you don't want!

The pattern may need to be slightly folded to fit on a rounded pumpkin. Fold the pattern so that the pattern lines match up.

If the pattern is too large or too small, you can use a copier to reduce or enlarge. Check out our Printing Tips for more information.

Step 5) Transfer Design
Using a pushpin, or a poker tool, make pinpoint marks 1/16" to 1/8" apart along the design lines. Check to see you have transferred the design completely, then take the pattern off the pumpkin.

Step 6) Saw Design
Using the carving saws saw dot-to-dot using a gentle up and down motion. Saw gently, the saws can break if they are forced.

Learn Sawing Skills: To learn sawing skills, hold the pumpkin in your lap. Hold the saw like a pencil and saw steadily with a continuous up-and-down motion. Saw at a 90-degree angle to the pumpkin. Use gentle pressure. Saws are breakable if used incorrectly.
Saw Dot to Dot: Saw dot-to-dot, following your pattern. Work from the center of the design outward. Remove and reinsert the saw to make corners.
Smallest Pieces First: Saw and remove smallest pieces first. Push the cut pieces out with your finger, not the saw blade.
Drill the Small Holes: Small holes (such as pupils of the eyes and stars in a flag) should be drilled, not sawed.
Long Thin Sections: With long thin sections, you can drill closely spaced holes if you have difficulty sawing or removing the section.

Step 7) Locate the Chimney
Locate and cut a chimney for the candle. If a flashlight or battery candle is used, a chimney is not needed. Place the candle in the bottom of the pumpkin. If candle does not stand on its own, place it on a small, non-flammable plate or bore a small hole in the bottom of the pumpkin to hold the candle.


Painting Instructions

You can also paint your pumpkins using the SpookMaster patterns to create new and exciting looks for Halloween. You will need art paints and brushes, which can be found at many department stores, art supply stores, and other retailers.

Use your imagination when painting. You can use paints with fluorescent colors to create a glowing nighttime effect. You can vary and contrast colors to create unique looks. Painting offers much versatility and room for creativity.

You will not be required to cut a lid or remove the pulp and seeds form a painted pumpkin, since the design is painted on rather than carved in. However, if you want the pumpkin to have interior lighting, you can cut a lid, remove the pulp and seeds, and install lighting to change the look of your pumpkin.

Tools Required for Painting
You will need a pushpin for transferring the patterns onto the pumpkin and art paints and assorted sized art paintbrushes. Durable paints last longer than washable watercolors. Also, if you plan to light the interior of the pumpkin, you will need a knife or large saw for cutting the lid and a scoop for removing the pulp and seeds.

Steps 1) and 2) Print and Attach Pattern and Transfer Design
Select the pattern you want to carve from the Free Stuff page or the Subscriber site. Check the carving difficulty to make sure you want to carve that pattern. Print the pattern and tape or pin it to your pumpkin. If you use pins, place them on the design lines so you don't end up with holes you don't want!

The pattern may need to be slightly folded to fit on a rounded pumpkin. Fold the pattern so that the pattern lines match up.

If the pattern is too large or too small, you can use a copier to reduce or enlarge. Check out our Printing Tips for more information.

Using a pushpin, or a poker tool, make pinpoint marks 1/16" to 1/8" apart along the design lines. Check to see you have transferred the design completely, then tear the pattern off the pumpkin.

Step 3) Paint Design
Paint the design on the pumpkin by using the pinpoint marks as guides. You can use a small brush to outline each painted area carefully, and then paint the rest of the area with larger brushes to save time. Always follow all instructions and precautions that are placed on the label of your paints.

Allow paint to dry in a cool, dry place.


Mix n' Match

Mix n' Match is a great way of creating exciting pumpkin carving patterns for Halloween. It's easy, it's fun, and it's only available from SpookMaster. Check out the Mix n' Match patterns on our Free Stuff page before you subscribe.

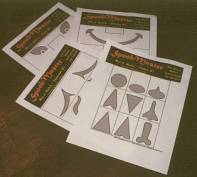
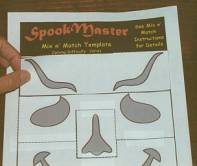
Mix n' Match Patterns Acrobat® files on the Free Stuff page and on the Subscriber site contain the patterns for making your own, unique pumpkin carving patterns. Patterns for separate facial parts (eyebrows, eyes, nose, and mouth) and a Mix n' Match template are provided.

Review the Mix n' Match Acrobat® file for instructions or follow the instructions below.

MIX N MATCH MIX N MATCH MIX N MATCH

1

2

3

MIX N MATCH MIX N MATCH MIX N MATCH

5

6

7


How To Make the Mix n' Match Pattern
Making the final pattern is easy, just follow these steps:

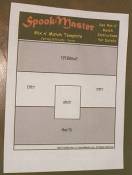
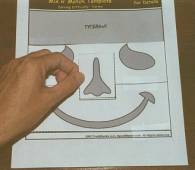
1) Print out the Mix n Match Template
Notice the position of the eyes, eyebrows, nose, and mouth.

2) Select Your Patterns
Select one or more templates for each facial feature (eyebrows, eyes, nose, and mouth) and print the templates you want.

3) Start with the Eyes
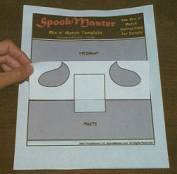
Select the eyes that you want and cut them out along the dotted lines provided on the template. Make sure to cut only along the dotted lines and do not cut along the solid lines that run between the eyes. Place the eyes in the area marked EYES on the Mix n' Match template and secure with transparent tape.

4) Select the Mouth
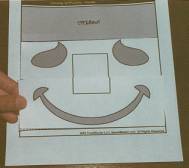
Select the mouth that you want and cut it out along the dotted lines provided on the template. Make sure to cut only along the dotted lines and do not cut along the solid lines. Place the mouth in the area marked MOUTH on the Mix n' Match template and secure with transparent tape.

5) Select the Nose
Select the nose that you want and cut it out along the dotted lines provided on the template. Place the nose in the area marked by the rectangle below the eyes and above the mouth and secure with transparent tape.

6) Select the Eyebrows
Select the eyebrows that you want and cut out along the dotted lines. Place the eyebrows in the area marked EYEBROWS on the Mix n' Match template and secure with transparent tape. The eyebrows can be inverted for a different look.

Use this as your final pattern or make a copy. Follow the instructions under Carving Instructions or Painting Instructions.


Mix n Match Tips and Tricks

  • Play with the pattern. Change the design for the eyes, eyebrows, nose, and mouth until you get a look that you love.
  • If you make a mistake, just print out a new Mix n' Match template or pattern and start again.
  • Let the kids play! You might be amazed at the combinations that kids come up with.
  • You can make many patterns that are easy for kids to carve and paint.
  • Use the letters and numbers (available only to subscribers) to personalize your pumpkin.
  • Some facial features go well together. For example, rounded eyes might go well with rounded eyebrows, nose, and mouth. However, it's your pumpkin, so design it just the way you like it.

Tips and Troubleshooting

Selecting a Pumpkin
Select a pumpkin that is ripe and has no bruises cuts or nicks. Do not carry a pumpkin by its stem; it may break, and do not bruise it since it will not last as long. Select a pumpkin that is the appropriate size and shape for the pattern that you wish to carve. Make sure the pumpkin has a flat bottom and has smooth texture and is evenly colored for best results. Remember that large pumpkins are easier to carve and paint than small pumpkins.

When To Carve Your Pumpkin
Do not carve your pumpkin too many days before you need it because carved pumpkins can shrivel and mold. If you wish to keep your carved pumpkin for a long time, follow the instructions for preserving your pumpkin in this troubleshooting guide.

How To Make Your Carved Pumpkin Last Longer
Two things happen to pumpkins once they are carved: 1) they dry out and shrivel and/or 2) they mold.

To protect against dryness and mold cover the carved pumpkin with plastic wrap and put the pumpkin into the refrigerator when it is not on display. You can also use specialized spray-on treatments that fight mold and help pumpkins last longer. To reduce shriveling, coat the cut edges of your carving with petroleum jelly. You can revive a shriveled pumpkin by soaking it in water for 1 to 8 hours in a bucket or bathtub. After removing it from the water, let it drain for ½ hour then dry it carefully. If your pumpkin molds or turns soft, there is nothing you can do.

Will A Painted Pumpkin Last Longer Than A Carved Pumpkin?
A painted pumpkin will last longer than a carved pumpkin if the painted pumpkin is left whole, with no cutting of a lid or scraping of the pulp and seeds.

If Your Pumpkin Is Too Small Or Too Large For Your Pattern
If the pattern is not right for your pumpkin, take the pattern template and reduce or enlarge it on a photocopier or check out our Printing Tips for help on how to make sizing your pattern easier. You can also take the patterns with you when you buy a pumpkin so you can select one that is the size and shape of your pattern.

How To Follow The Design After Transferring It
If your transfer is hard to see, rub flour over the dots to make them more visible. If your design is unclear, your dots may be too far apart or too large. Refer to your pattern and jack-o-lantern graphic and use a pen or dull lead pencil to connect the dots. Avoid these problems by making your dots smaller and closer together.

If You Have Trouble Carving Certain Shapes
Certain shapes can cause some difficulties, especially on challenging patterns. Remember, small holes (such as pupils of the eyes) should be drilled, not sawed. With long thin sections, you can drill closely spaced holes if you have difficulty sawing or removing the section.

Carving Painting Tips and Troubleshooting
Selecting a Pumpkin Be Careful!!! Mix n Match